
I spent my first season on my Portland balcony feeling shocked when my leftover bell peppers rotted before I could even eat them. I stood there with my eight dollar trowel and realized I had wasted dozens of high-quality seeds by letting the plants over-ripen. I decided then to learn how to save vegetable seeds properly so I could keep my garden going for free every single year. You do not need professional equipment or a massive farm to preserve your own genetics. You just need a few basic kitchen tools and a dry place to store your harvest for the next planting cycle.
Why you should save vegetable seeds this season
Commercial seed packets often cost a fortune and contain way more seeds than your tiny apartment balcony actually requires. When you save vegetable seeds, you stop relying on expensive shipments and build a collection perfectly adapted to your specific local climate. Plants that thrive on your balcony this year will produce offspring that handle your specific wind and sun patterns even better next year. You create a resilient cycle of food production that costs you absolutely zero dollars after the initial purchase.
Most people assume this process takes complex science or fancy laboratory gear. In reality, nature designed these plants to drop their offspring onto the dirt to start the cycle again automatically. You simply step in and assist that process by collecting, cleaning, and storing the material for a few months.
Understanding hybrid versus heirloom varieties
You must identify whether your plants are heirloom or hybrid varieties before you start the collection process. Heirloom plants are open-pollinated and will produce offspring that look and taste exactly like the parent plant. Hybrids are cross-bred for specific traits and will produce chaotic, unpredictable results if you try to grow their seeds again. Check the information on your original packet to ensure you work with stable heirloom genetics. Reading the complete beginner’s guide to growing food at home helps you understand which varieties work best for your unique urban setup.
Harvesting dry seeds from pods
Some plants like green beans or peas keep their seeds hidden inside protective pods that dry out naturally on the vine. You must leave these pods attached to the plant long after the vegetable stops looking edible. The pods should feel brittle, brown, and totally dry to the touch. I leave my bean pods hanging on the trellis until they sound like little rattles when I shake the vines.
Pull the dry pods off and crack them open over a clean white bowl to catch the contents. Remove all the tiny bits of chaff or dead plant material by blowing on the pile gently. The light dust will fly away while the heavier, healthy seeds stay safely in the bowl.
A non-obvious trick for testing viability
You might struggle to tell if a seed actually holds a living embryo or if it is just a hollow shell. Drop your entire collection into a glass of cool water and watch how they react. Healthy, viable seeds are dense and will sink to the bottom of the glass within a few minutes. Dead, hollow seeds will float right on the surface.
This non-obvious trick allows you to skim off the floaters and keep only the strongest, most capable seeds for your garden. Dry the sinkers carefully on a paper towel before you put them into permanent storage.
Harvesting wet seeds from fleshy fruits
Tomatoes and cucumbers require a more involved process because they grow inside thick, sticky layers of protective pulp. The pulp contains natural growth inhibitors that stop the seeds from sprouting inside the warm fruit. You must remove this pulp through a simple fermentation process to clean the surface effectively.
Scoop the pulp and seed mass into a glass jar and add a splash of tap water. Cover the top with a paper towel and leave it on your kitchen counter for three days. You will see a layer of mold start to form on the surface, which indicates the pulp is breaking down successfully.
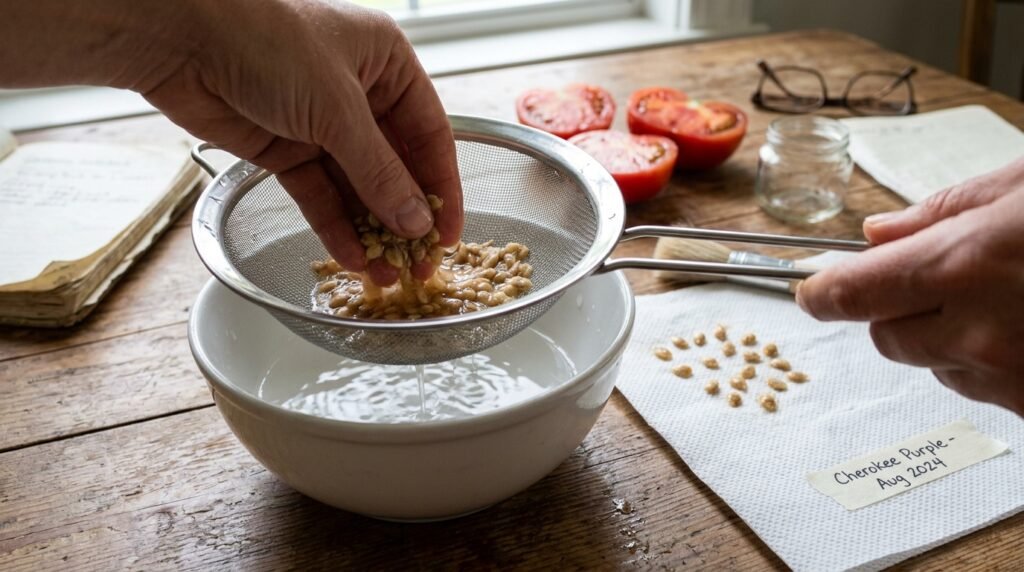
Cleaning and drying the wet material
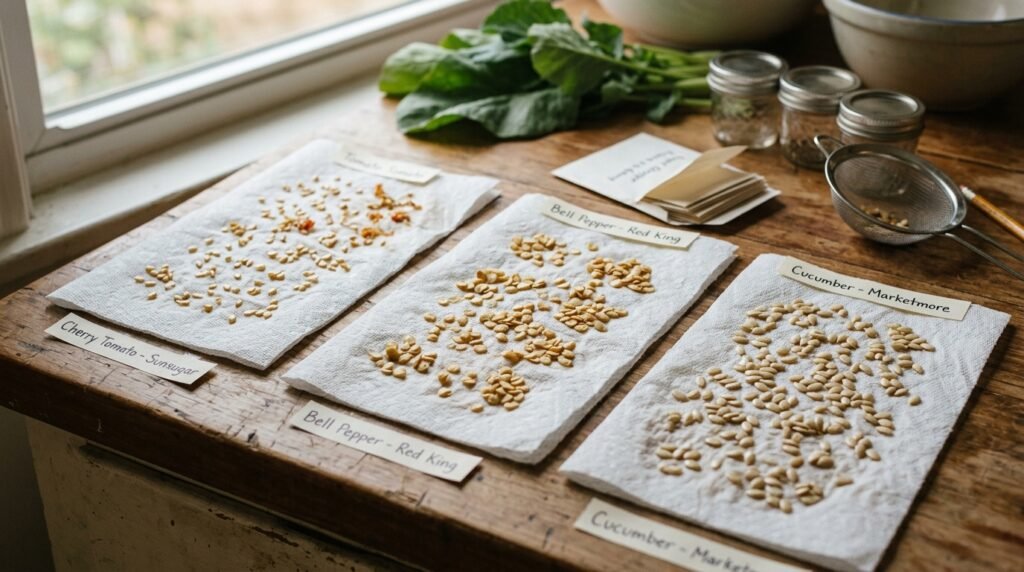
Pour the fermented mixture into a fine mesh strainer and rinse it thoroughly under a cold faucet. The water will wash away the gross pulp and leave the clean, hard seeds trapped in the mesh. Spread these seeds out in a single layer on a piece of parchment paper.
Keep them away from direct sunlight while they dry to protect the living tissue from intense heat. Once they feel hard and snap instead of bending, they are ready for their final home. Checking the easiest vegetables to grow for beginners will help you pick the right fruits to start your collection.
Organizing and storing your stash
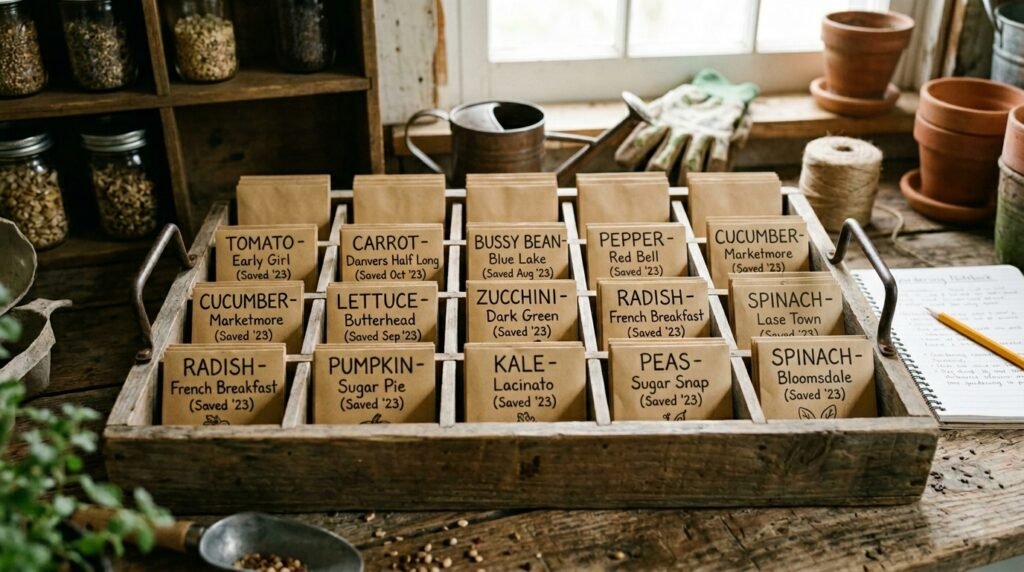
Moisture and heat remain the absolute biggest enemies of long-term storage success. You must keep your collection in a dark, cool, and perfectly dry environment throughout the winter. I store all my labeled paper envelopes inside a glass mason jar tucked into the back of my closet.
The glass provides a physical barrier against humidity and prevents hungry pests from munching on your winter stash. Write the plant variety and the exact harvest date on every single envelope with a waterproof pen. Knowing exactly when you gathered the goods allows you to rotate your stock effectively over the years.
Protecting your stash from temperature swings
Avoid storing your collection in a garage or a basement that fluctuates wildly in temperature. Consistent cool room temperatures keep the seeds dormant and prevent them from burning through their energy reserves too quickly. I keep my jar in my bedroom closet where the air stays stable all year round.
The gardening team at Gardening Know How emphasizes that stability is key to longevity. A well-stored stash can often stay viable for three to five years if you manage the conditions correctly.
Common mistakes to avoid during harvest
Do not wait for the very first frost to arrive before you finish your collection work. Intense cold can damage the internal structure of the seeds and ruin their ability to germinate in the spring. Harvest everything while the plants still look somewhat healthy and before the moisture content becomes unstable.
You also want to avoid gathering material from plants that showed signs of disease during the season. Viruses and fungal spores can hitch a ride on the outer surface of the seeds and reappear next year. Only save material from your most vigorous, healthy, and high-producing plants.
Keeping your collection labeled clearly
It seems obvious until you are staring at a pile of ten different unlabeled brown packets in March. I once mixed up my hot pepper seeds with my mild sweet bell peppers. That accident resulted in a very spicy salsa that surprised my entire family during the summer barbecue.
Always label your envelopes at the exact moment you package them up for the season. Precise documentation prevents any confusion when the spring planting fever finally hits your balcony again.
Preparing for the next planting season
Check on your storage jar periodically during the winter to ensure no pests or moisture have compromised the envelopes. You want to keep the air inside the jar as dry as possible. Many people add a small food-grade silica packet into the jar to suck up any lingering humidity.
This simple step adds an extra layer of security for your valuable agricultural investments. You will feel incredibly satisfied when you open your jar in the spring and see the bounty you preserved yourself.
Saving your own supply of genetics turns you into a much more observant and connected gardener. You start to notice the subtle differences in plant growth and flavor that supermarket shoppers totally miss. The process rewards you with a deep sense of self-sufficiency that feels incredibly good in a modern world. You just need a bowl, a strainer, and a dark closet to start your own living collection. Learn how to save vegetable seeds this year and watch your apartment patio garden grow better every single season.
Felipe Macedo is a home gardener and food grower based in Portland, Oregon. After killing his first three tomato plants, he became obsessed with figuring out how to grow real food in small spaces — on balconies, in containers, and in raised beds he built himself. At Chatinovax, he shares everything he learned the hard way so you don’t have to.