
I planted my first batch of garlic purely by accident. I tossed a forgotten, sprouting grocery store bulb into an empty yogurt container on my Portland balcony. I used my trusty eight dollar trowel to bury the cloves in some old potting dirt. I completely ignored the pot through the freezing Oregon winter. I assumed the constant rain ruined the seeds completely. Nine months later, I pulled three perfect, spicy bulbs out of the mud. You do not need a massive backyard plot or professional farming equipment to succeed. You can easily grow garlic at home using small pots or compact wooden boxes. It requires almost zero daily maintenance and survives freezing temperatures without any complaint. You just need a little patience and the right soil texture to get started.
Why you must grow garlic at home this season
Store bought garlic often sits on cargo ships for months before hitting the supermarket shelves. This long travel time completely degrades the spicy oils and leaves you with bland, rubbery cloves. The skin turns extremely tough and the inner core develops a harsh, bitter taste. You skip this terrible commercial supply chain entirely when you grow garlic at home on your own patio.
Homegrown bulbs possess a sharp, sticky, and intense flavor that completely changes your daily cooking. You only need a few small containers to produce enough fresh seasoning to last you an entire year. The plants stay relatively narrow and fit perfectly into the tight gaps of a small apartment balcony layout. You maximize your available space while growing a highly valuable kitchen staple.
Picking the right variety for containers
You have two main choices when ordering seeds for your patio garden. Hardneck varieties produce a stiff central stalk and perform incredibly well in cold winter climates. They also grow a delicious edible flower stem called a scape in the early summer. This gives you two separate harvests from a single plant.
Softneck varieties lack that stiff center and store much longer in your kitchen pantry. Softnecks handle mild winters better and usually produce more individual cloves per bulb. The seed experts at Burpee highly recommend starting with softneck types if you live in a warmer southern region. I strictly grow hardneck types here in Oregon because they laugh at the brutal winter frost and taste significantly sharper.
Choosing deep pots and raised beds
Garlic develops a surprisingly deep root system that anchors the heavy bulb securely in the dirt. You cannot grow this specific crop in shallow window boxes or tiny decorative patio planters. You need containers measuring at least twelve inches deep to give the roots proper physical space. Shallow dirt causes the bulbs to push themselves entirely out of the soil.
Standard five gallon plastic buckets work perfectly and cost almost nothing at the local hardware store. You can also build deep wooden boxes to hold multiple rows of tight plants. Reading how to build a raised garden bed for under $50 shows you how to construct the perfect container on a tight budget. You must drill several large drainage holes into the bottom of any plastic container you use. Standing water rots the cloves instantly during the wet winter months.
Prepping your dirt for winter survival
Heavy garden soil compacts into a solid block of ice during a freezing winter. You must use a fluffy, well draining potting mix designed specifically for container growing. Checking the best soil mix for a raised bed vegetable garden shows you the exact dirt texture you need. A light mix prevents the roots from suffocating under heavy mud.
Mix a heavy dose of organic compost directly into your dirt before you plant anything. This compost provides a slow and steady food source that lasts right through the dark winter. Add a handful of white perlite to guarantee the water drains completely after a heavy rainstorm. Excellent drainage remains your absolute best defense against fungal root diseases.
The proper way to grow garlic at home
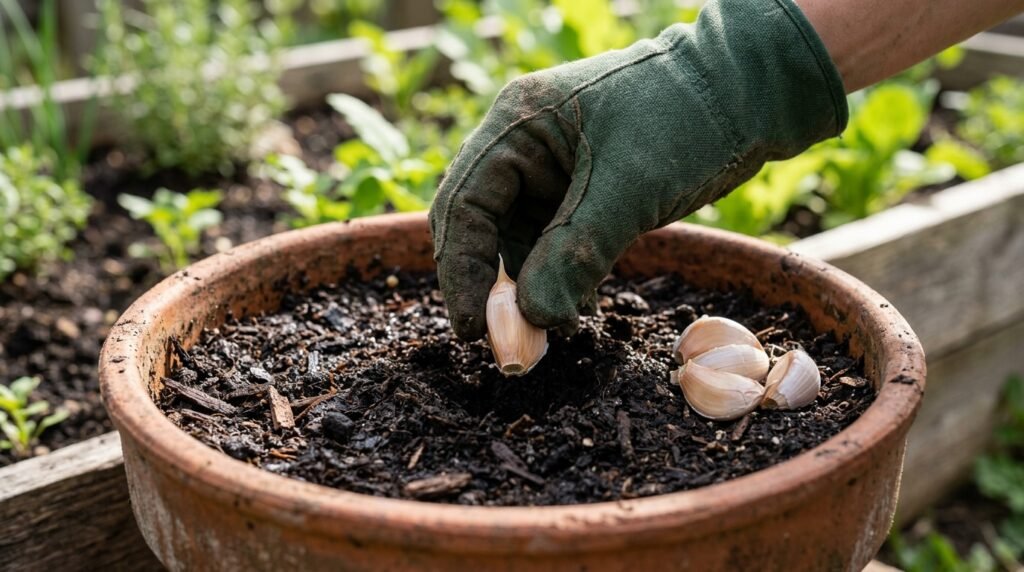
You must plant this specific crop in the middle of autumn rather than the spring. The cloves need a long period of cold weather to split into multiple separate pieces underground. Break your large seed bulb apart gently with your bare hands right before you plan to plant. Breaking them too early causes the raw cloves to dry out completely.
Keep the thin paper skins completely intact on every single clove you separate. Press the cloves into the dirt with the flat root side facing down and the pointy tip facing the sky. When you grow garlic at home, you must bury the cloves exactly two inches deep. Leave about four inches of empty dirt space between every single piece you plant.
A non-obvious trick for massive bulbs
Fungal rot destroys countless patio crops during cold and wet winters. The damp dirt invites microscopic bacteria to attack the raw cloves before they sprout strong roots. You can protect your seeds using a very simple kitchen remedy right before planting them. This stops the bacteria from ever taking hold.
Soak your separated cloves in a glass jar filled with tap water and a tablespoon of baking soda. Let them sit in this alkaline liquid for exactly twelve hours before pushing them into the dirt. This non-obvious trick kills existing fungal spores clinging to the dry paper skins. You guarantee a perfectly healthy start for your heavy summer harvest.
Managing moisture through the freezing winter
Your potted cloves will push tiny green shoots out of the dirt before the heavy winter snow arrives. Do not panic when you see these fragile green leaves sitting in the freezing cold. The plant biologically expects the frost and goes completely dormant to protect itself naturally. It will simply stop growing and wait for the warm spring sun.
You must stop watering your containers entirely when the temperature drops below freezing. The frozen dirt cannot absorb any additional moisture and the expanding ice will crush the delicate roots. You only need to provide manual water during unusually warm and completely dry winter weeks. Rain and snow usually provide plenty of hydration.
Adding heavy mulch to protect the roots
Containers freeze much faster than the actual ground because cold air hits the plastic sides directly. You must insulate your patio pots to protect the sleeping bulbs from extreme temperature swings. A thick blanket of organic mulch solves this problem immediately and keeps the soil temperature completely stable.
Cover the top of your dirt with three inches of clean straw or shredded dry leaves. This physical blanket traps the soil heat and prevents rapid surface evaporation. The gardening team at The Old Farmer’s Almanac considers thick winter mulch mandatory for northern climates. Remove this heavy mulch layer carefully in early spring so the wet soil can finally warm up.
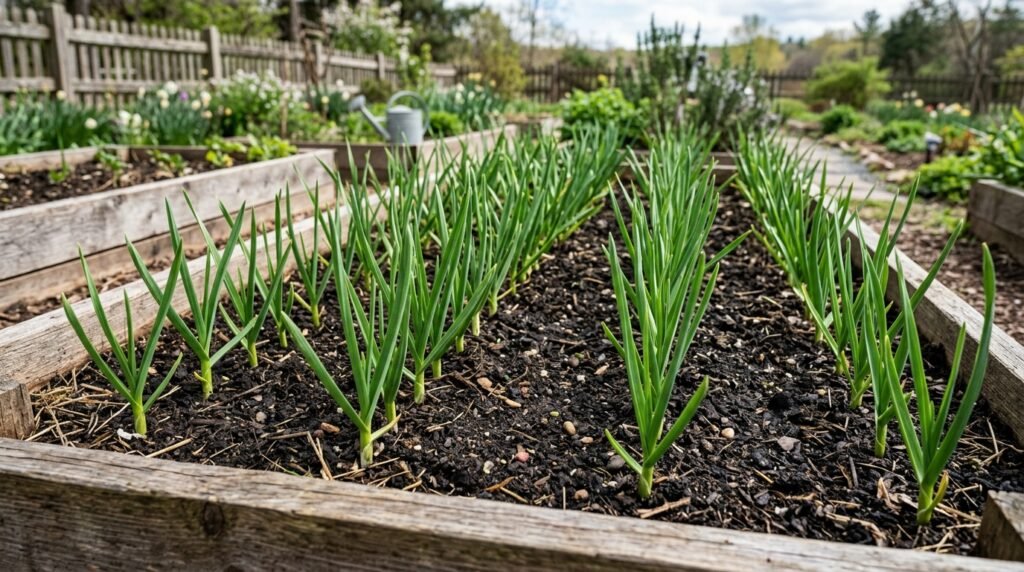
Spring feeding routines to grow garlic at home
The warming spring sun wakes the dormant bulbs up and triggers massive green growth. The plants consume huge amounts of nitrogen to build those tall, thick leaves rapidly. You must start feeding your pots the second the green shoots look active again. Delaying this feeding limits the final size of your harvest completely.
Apply a strong liquid fish emulsion directly to the soil every two weeks. This organic nitrogen boost forces the plant to build a massive biological engine above the ground. The size of the final underground bulb directly matches the size of the green leaves above. If you want huge bulbs, you must grow huge leaves first.
Removing the scapes for bigger bulbs
Hardneck varieties push a curled, solid green stalk out of the center of the plant in late May. This weird stalk is called a scape and it eventually forms a small white flower. You must physically snap this curly stem off the plant the second you see it forming. Do not let the flower bloom under any circumstances.
The plant wastes massive amounts of energy trying to grow that flower and produce tiny seeds. Snapping the scape off forces the plant to redirect all that energy back down into the underground bulb. You can actually dice the removed scapes and cook them exactly like fresh green onions in a stir fry.
Recognizing when your patio crop finishes
Knowing exactly when to pull your plants out of the dirt takes careful daily observation. You cannot check the actual root size because the food sits completely buried in the dark potting soil. You must read the biological signals written clearly on the tall green leaves. The leaves act as a visual timer for the underground bulb.
Stop watering your pots completely when the bottom three leaves turn pale yellow and dry up. The plant is finishing its life cycle and preparing the bulb for a long winter sleep. Reviewing how to know when vegetables are ready to harvest helps you master this visual timing perfectly. Wait exactly one week after stopping the water before pulling the bulbs.
Pulling the bulbs without causing damage
Never grab the green stalk and pull upward with all your physical strength. The heavy clay or potting soil holds the roots tight and you will snap the stem right off. A broken stem invites aggressive rot and ruins the entire vegetable instantly. You must use tools to help lift the harvest.
Push a small hand trowel deep into the dirt a few inches away from the main bulb. Gently pry the soil upward to loosen the tight pressure around the roots. The entire plant will slide out of the dirt perfectly whole with a very gentle tug. Shake the loose dirt off carefully.
Curing the harvest for long term kitchen storage
You cannot wash your fresh bulbs or toss them directly into the refrigerator crisper drawer. The raw skin contains too much moisture and will mold rapidly in a dark, cold environment. You must cure the harvest properly so the paper skins dry completely and protect the inner cloves.
Lay the whole plants flat on a wire rack in a warm, dry spot with plenty of airflow. A covered patio table or a dry apartment garage works perfectly for this crucial drying stage. Let them sit completely undisturbed for about three full weeks. The moving air slowly pulls the excess water out of the plant tissue.

Trimming and storing the final product
The curing process finishes when the outer skins feel completely dry and brittle like thin paper. The remaining green leaves should look entirely brown and crispy to the touch. Take sharp scissors and cut the roots completely off the bottom of the dry bulb. This stops the bulb from drawing any extra moisture from the air.
Cut the stiff main stalk about one inch above the top of the actual vegetable. Store the cleaned bulbs in a wire basket on your kitchen counter out of direct sunlight. They will last for several months in a dry room temperature environment.
Planting this tough crop requires almost zero active work during the actual growing season. You put the cloves in the cold dirt in autumn and practically ignore them until summer arrives. You do not have to fight massive insect invasions or deal with complicated daily pruning schedules. Just give them deep pots, loose soil, and a strong dose of spring nitrogen. You will quickly discover how simple it is to grow garlic at home on a tiny apartment balcony. You get a massive harvest of intense flavor that completely ruins the bland grocery store options forever.