Standing outside with a heavy watering can gets old incredibly fast during the dry season. You finish a long shift at work and immediately have to haul water to your thirsty plants. I spent my entire first summer doing this exact chore on my south-facing Portland balcony.
I started my tiny patio farm with empty yogurt containers and a rusty eight dollar trowel. I slowly upgraded to larger wooden boxes, but my manual watering habits stayed exactly the same. I quickly realized that hauling heavy buckets of tap water ruined the actual fun of patio farming. Building a cheap drip irrigation system for raised beds gives you your summer evenings back completely.
Why you need a drip irrigation system for raised beds
Most beginners assume automatic watering setups cost hundreds of dollars and require professional plumbers. You actually just need a few basic plastic tubes and a free weekend to build one yourself. A proper automatic watering setup delivers water exactly where the plants need it most. It pushes slow drops of moisture directly into the dirt right at the base of the main stem.
This slow delivery method allows the dry potting soil to absorb the water completely like a sponge. When you dump water from a bucket, half of it runs down the sides and out the bottom holes. You end up wasting expensive liquid fertilizer and leaving the actual root zone completely bone dry.
Reviewing how to water a vegetable garden without overwatering shows why consistent moisture matters. Consistent watering prevents your tomato skins from splitting and keeps your lettuce tasting perfectly sweet.
The hidden dangers of overhead watering
Splashing water all over your green foliage invites massive problems during the late summer months. Fungal spores love to land on wet leaves and multiply rapidly in the warm afternoon air. Powdery mildew and early blight will completely destroy a healthy patio crop in just a few days.
Putting water directly on the dirt keeps your green leaves completely dry and perfectly safe. The agricultural experts at Gardening Know How confirm that ground level watering stops most soil borne diseases entirely.
You also save an incredible amount of water by eliminating basic surface evaporation. The hot sun cannot steal moisture that sits buried an inch below the topsoil.
Gathering parts for a drip irrigation system for raised beds
You can find every single piece you need at your local neighborhood hardware store for cheap. You need a roll of half inch blank poly tubing to act as your main water highway. This thick black pipe carries the heavy water pressure directly from your spigot to your wooden boxes.
You also need a roll of quarter inch micro tubing to branch off from that main line. These smaller tubes carry the water directly to the individual plants sitting in the dirt. You connect everything using cheap plastic barbed fittings that push right into the soft plastic pipes.
Checking out how to use raised beds to maximize a small backyard garden helps you calculate exactly how much tubing you actually need. Always buy an extra roll of the small micro tubing because you will make cutting mistakes.
Choosing the right water source on a balcony
Many apartment renters do not have access to a dedicated outdoor water spigot on their patio. You do not have to abandon your automatic watering dreams just because you lack exterior plumbing. You can easily build a gravity fed water reservoir using a heavy duty five gallon plastic bucket.
Drill a small hole near the bottom of the bucket and attach a basic plastic spigot valve. Set this heavy bucket on a sturdy chair or a wooden crate to elevate it above your plants. The natural force of gravity pushes the water down through your pipes perfectly.
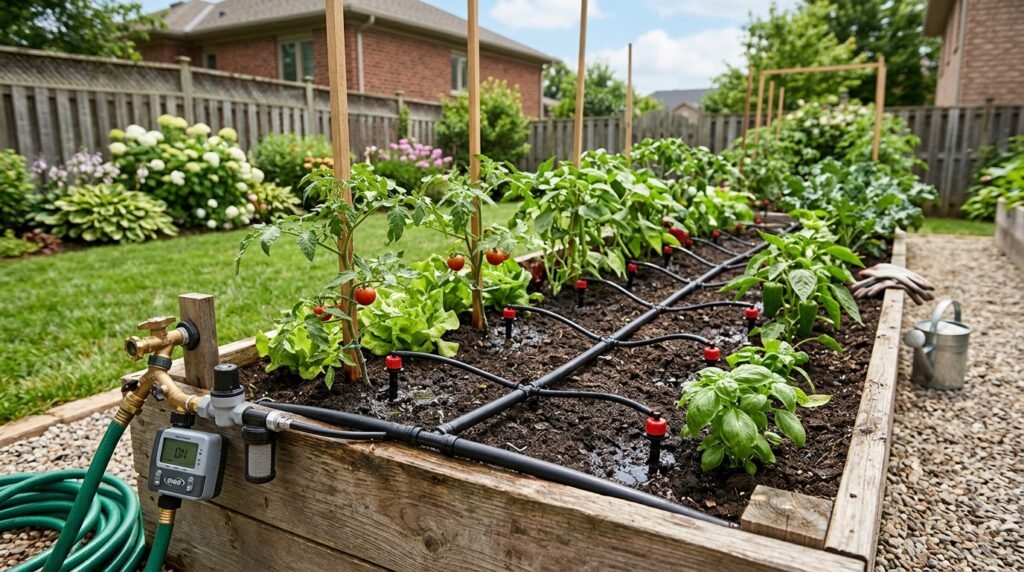
How to map out a drip irrigation system for raised beds
You must draw a physical map of your containers before you cut any of your expensive tubing. Grab a piece of scrap paper and sketch out where your heaviest feeding plants actually sit. You want the main half inch line to run straight across the back edge of your wooden boxes.
This specific placement hides the ugly black pipe from view and keeps it out of your way. You then run the smaller quarter inch lines off the main pipe directly to the individual plant roots. Planning this route carefully stops your patio from looking like a disorganized mechanical spider web.
A proper layout should blend quietly into the background of your patio farm. The focus should remain on the beautiful green vegetables rather than the complicated plastic plumbing.
A non-obvious trick for punching perfect holes
You have to punch small holes into the thick main line to attach your smaller micro tubes. Hardware stores sell specialized plastic punch tools that require a massive amount of hand strength to squeeze. My hands ached terribly after fighting with cold, stiff plastic tubing for two straight hours.
You can soften the thick black poly tubing by leaving it sitting in the direct afternoon sun. The hot sun warms the plastic and makes it incredibly soft and pliable for about twenty minutes.
If you build your setup on a cloudy day, soak the tubing in a bowl of hot tap water first. The hot water softens the thick plastic instantly and allows the plastic barbed fittings to slide right in. This non-obvious trick saves your hands and guarantees a watertight seal every single time.
Assembling the drip irrigation system for raised beds
Roll your main half inch line across the length of your patio and cut it with heavy scissors. Push a plastic end cap onto the far side of the tube so the water cannot escape. Attach the other end directly to your water spigot or your elevated gravity bucket.
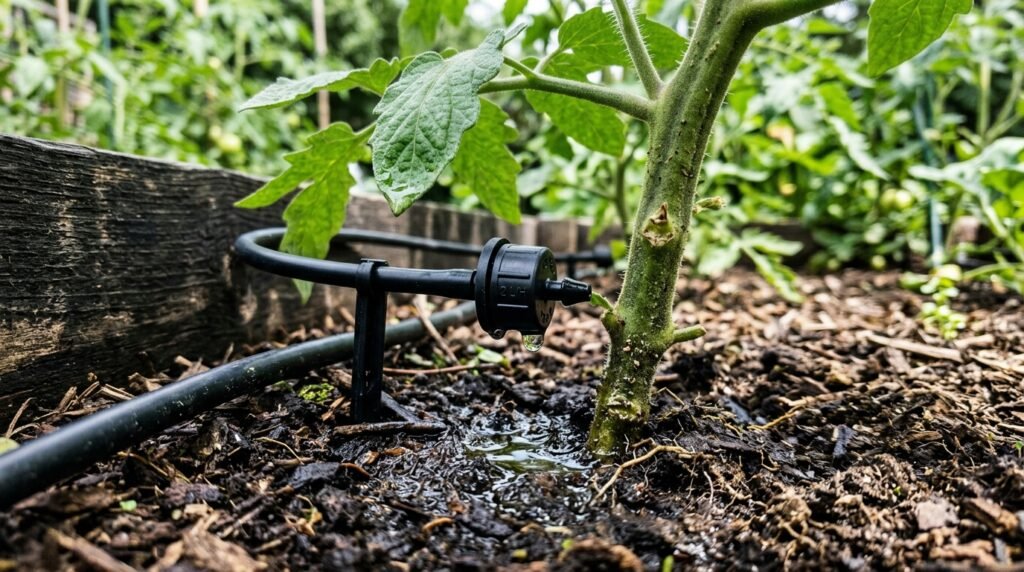
Use your punch tool to pop holes into the main line exactly where your wooden boxes sit. Push a plastic connector barb into the hole and attach your small quarter inch micro tubing. Run that tiny tube right to the base of your tomato plant and attach a small plastic emitter.
Understanding the easiest vegetables to grow for beginners tells you which plants need the most water. You can buy different emitters that drop one or two gallons of water per hour based on plant needs.
Securing the lines against summer wind
The hot summer sun causes the plastic tubing to expand and warp across the top of your dirt. A strong wind gust will actually blow the lightweight emitters completely away from the plant roots. Your automatic setup fails completely if the water drips onto bare dirt instead of the root zone.
You must secure the small tubing firmly to the soil surface using cheap metal landscape staples. Push the metal staples deep into the potting mix right over the top of the black plastic pipe. These metal anchors hold the emitters perfectly in place regardless of the brutal patio weather.
Automating your drip irrigation system for raised beds
You get the absolute most value out of this project when you add a cheap digital water timer. A battery powered timer attaches directly to your spigot and controls the exact water flow automatically. You literally never have to think about watering your patio farm for the rest of the summer.
You program the timer to open the valve at six in the morning before the sun gets hot. The timer runs the water for twenty minutes and then shuts off completely on its own. Adding this digital brain completes your drip irrigation system for raised beds and gives you total freedom.
You can pack a bag and leave town for a long holiday weekend without begging neighbors for help. Your plants will receive the exact amount of moisture they need while you enjoy your vacation entirely.
Adjusting watering schedules for Portland weather
You cannot just set the digital timer in May and ignore it until the autumn frost arrives. A sudden heatwave requires significantly more moisture than a cool and cloudy spring afternoon. You must adjust the watering duration on the digital clock based on the actual local weather forecast.
During the peak heat of August, your mature plants might need watering twice a day to survive. The agricultural guides at The Old Farmer’s Almanac suggest observing plant stress closely during these brutal heat waves. If the leaves wilt heavily by noon, you need to add another ten minutes to your morning watering cycle.
Maintaining a drip irrigation system for raised beds
The tiny holes in the plastic emitters clog very easily with hard water minerals and microscopic dirt particles. You must inspect the end of every single tube once a month to ensure the water flows freely. If a plant suddenly looks yellow and wilted, check the plastic emitter for a hard mineral blockage immediately.
You can soak clogged plastic emitters in a small cup of white vinegar to dissolve the hard calcium buildup. The vinegar eats away the white crust and restores the proper water flow in about ten minutes. Routine maintenance keeps a cheap tubing setup running perfectly for many consecutive years.
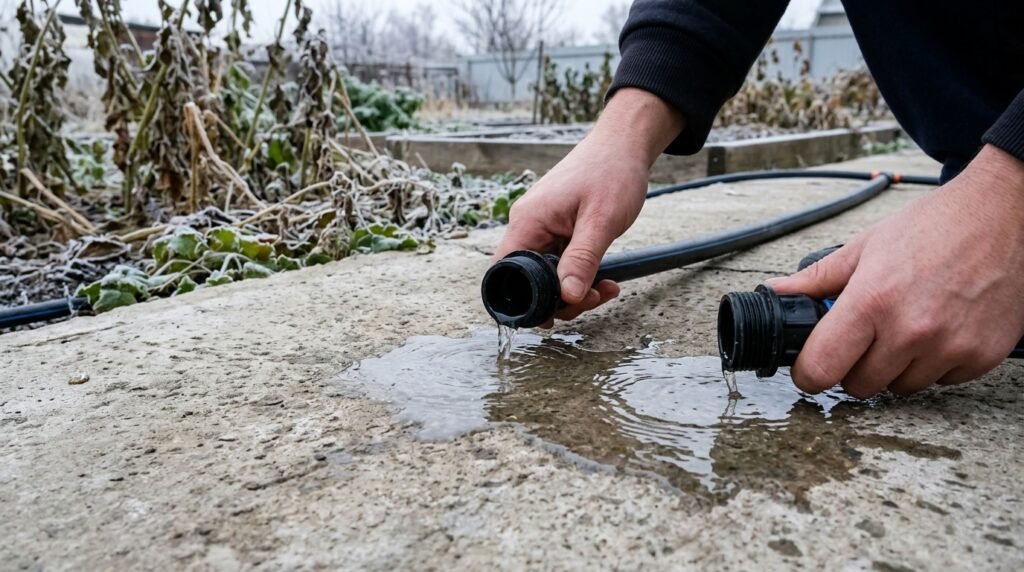
Winterizing your plastic tubing properly
You absolutely must protect your new watering setup from the freezing winter temperatures. Water left inside the black plastic pipes expands violently when it freezes into solid ice. This expansion cracks the hard plastic fittings and ruins your entire system before spring arrives.
When the autumn frost kills your final summer crops, detach the main timer from the spigot immediately. Open the end caps on the main line and let all the trapped water drain out onto the concrete. Store the digital timer inside your warm apartment to protect the fragile internal computer board.
Taking control of your patio watering routine changes your entire perspective on small space farming. You no longer have to plan your entire evening around carrying heavy buckets of tap water outside. You invest a few hours of physical labor on a weekend to build a completely self sustaining garden. A reliable drip irrigation system for raised beds protects your expensive plants and guarantees a massive harvest. Grab some cheap plastic tubing, punch a few holes, and watch your patio farm thrive completely on autopilot.